Tuesday, May 4, 2021

Spaghetti Pie

This spaghetti pie takes a little longer and a bit more effort to make than regular spaghetti, but it's well worth the wait.  It is great the next day for leftovers, and it is excellent to make ahead and bake the next day. I first made this nearly fifteen years ago, so it's definitely a tried and true recipe! Even my pickiest eater loves it!  This makes 8 good sized servings.  If people are super hungry I'll serve with a baguette and salad.


 Ingredients


1 lb spaghetti 
1 (250 g) cream cheese brick
1 cup sour cream
1/2 cup parmesan, grated
1/2 cup green onions, chopped
1 lb lean ground beef
1/4 tsp salt
1/4 tsp black pepper
1/2 tsp rosemary
2 cloves garlic, minced (or 1 tsp jarred)
1/2 cup red bell pepper, diced
1 jar (680 ml) pasta sauce
1  1/2 cups cheddar cheese, shredded


Directions

  1. Preheat oven to 350 degrees F.
  2. Bring a large pot of lightly salted water to a boil. Add pasta and cook for 8 to 10 minutes or until al dente.  Drain and return to pot.  
  3. Add the sour cream, green onions, cream cheese and parmesan.  Stir over low heat until all is melted and spaghetti is thoroughly coated. 
  4. Spray a 9x13 inch baking dish with cooking spray.  Place spaghetti mixture into baking dish and smooth down top. 
  5. In the meantime, in a large skillet, brown the ground beef over medium heat.  Drain any excess fat and return meat to skillet.   
  6. Stir in salt, pepper, garlic, bell pepper, rosemary and pasta sauce. 
  7. Bring to a boil, then reduce heat and simmer for 20 minutes.
  8. Pour meat mixture over pasta and sprinkle with cheddar cheese.
  9. Cover and bake for 25 minutes. Uncover and bake for 5 more minutes until the cheese is bubbly.


Wednesday, April 28, 2021

Chicken and Rice

The boys absolutely love this chicken and rice dish, and its extraordinarily simple to make for a quick weeknight dinner.  I call this "cheaters" chicken and rice as it uses salsa rather than tomatoes and seasonings separately, but it's so delicious I needed to share.


Ingredients


3 boneless, skinless chicken breasts
2 tbsp vegetable or canola oil
1 1/2 cups uncooked white rice
1 small onion, finely chopped
2 cups chicken broth
1 cup salsa
1 cup mixed vegetables, frozen


Directions

  1. Place chicken breasts in a medium saucepan and cover with water.  Bring to a boil, then lower heat and continue to simmer about 10 minutes until cooked through and chicken has reached an internal temperature of 165°.  
  2. Remove chicken from saucepan to a plate and let sit for 10 minutes.  Shred with forks.
  3. Meanwhile, heat oil in a large, heavy saucepan over medium heat. Stir in onion, and cook until tender, about 5 minutes.
  4. Add rice to saucepan and stir.  When rice begins to brown, stir in chicken broth and salsa.  Bring to a boil.
  5. Reduce heat, cover and simmer 20 minutes until liquid has been absorbed.
  6. Heat mixed vegetables in saucepan or microwave until hot. 
  7. Add shredded chicken and vegetables to rice and stir until well blended. 

Thursday, April 8, 2021

Hashbrown Casserole

This cheesy hashbrown casserole is quick to prepare and can be made ahead of time.  It's budget friendly and makes enough to feed a crowd.  We have this dish at most big family dinners; Christmas, Easter and Thanksgiving, and everyone looks forward to it! 
 
Ingredients

2 lb bag of frozen, diced hashbrowns
1/2 cup butter, melted
2 cups sour cream
1/2 cup onion, chopped
2 cups old cheddar, grated
1 can cream of chicken soup (undiluted)
1 tsp salt
pepper to taste

Topping


2 cups Corn Flakes, crushed
1/2 cup butter, melted

Directions

  1. Place hashbrowns in a large bowl.  Pour melted butter over the top and stir.
  2. In another bowl, mix the rest of the ingredients (except topping).
  3. Pour over potatoes and mix well.
  4. Pour into greased 9"x12" pan.
  5. Mix topping ingredients. Spread over potatoes.
  6. Bake in 350°F oven for one hour.

Shrimp Fettuccine

Shrimp Fettuccine is a quick and easy dish to get on the table, and it looks super fancy.  The  boys all love this buttery, garlicy shrimp tossed with fettuccine dinner, which takes under 30 minutes to get to the table.  This can be served as a casual comfort food, or an elegant meal for guests.  I serve this up with a baguette for dipping in the delicious garlic butter sauce, and if they boys are particularly hungry, I add a garden salad too.

This can be made with any kind and size of shrimp. I tend to buy medium-sized frozen shrimp and choose shrimp that is already peeled and deveined to cut down on prep work.

Ingredients


1 package (450g) fettuccine 
1 1/2 lbs (680g) uncooked medium shrimp, peeled and deveined
1/2 cup butter
2 garlic cloves, minced
2 tbsp lemon juice
1/4 cup chicken broth
1/2 tsp salt
1/8 tsp pepper
1/4 cup chopped cilantro
1/4 cup parmesan, grated

Directions

  1. Cook fettuccini according to package directions.  Drain and set aside.
  2. In a large skillet sauté the shrimp in the butter, for approximately 4 minutes.
  3. Add garlic, lemon juice, broth, cilantro, salt and pepper. 
  4. Cook and stir 2 minutes until garlic is tender.
  5. Toss with cooked fettuccini, stirring until heated through.  
  6. Serve, topped with a sprinkle of parmesan.


Chicken Pot Pie

This chicken pot pie is stuffed full of chicken and vegetables in a creamy sauce.  This recipe makes two pies, so you can have one for dinner, and have one another day, freeze it, or give one to a neighbour or friend as a delicious gift. 


My boys really love this pie. It fills them up and is a complete meal, and it's a hundred times better than any meat pie you'll find at the grocery store. If I'm feeling fancy, sometimes I will add a garden salad and/or a baguette on the side. 


I realized early on that it is important to ensure you do measure the amounts of vegetables because if you just guess and make too much, the pies will be overflowing and the tops won't stay sealed.


Ingredients


2 cups diced peeled potatoes (about 2 medium potatoes)
1 3/4 cups sliced and quartered carrots (about 2 medium carrots)
1 cup butter
2/3 cup chopped onion (about 1/2 medium onion)
1 cup all purpose flour
1 3/4 tsp salt
1 tsp thyme
3/4 tsp pepper
3 cups chicken broth
1 1/2 cups milk
4 cups cubed cooked chicken (about 3 chicken breasts - see notes below)
1 cup frozen peas
1 cups frozen corn
2 boxes of Tenderflake ready-to-bake deep-dish pie shells

Directions

  1. Preheat oven to 425°F.
  2. Place potatoes and carrots in a medium saucepan, cover with water.  Bring to a boil.  Reduce heat and cook for 8-10 minutes until tender-crisp.  Drain and set aside. 
  3. In a large skillet, heat butter at medium-high heat.  Add onion and cook until tender.  
  4. Stir in flour and seasonings until blended.  Gradually stir in broth and milk. 
  5. Bring to a boil, stirring constantly.  Cook a further two minutes or until thickened.
  6. Stir in peas, corn, carrots, potatoes and chicken, and mix until thoroughly combined.
  7. Remove from heat.
  8. Place half of mixture into each pie crust. Wet edges of crust and top with second crust.
  9. Seal edges with a fork, and cut slits in the top of pie for venting.
  10. Bake 35-40 minutes or until crust is light brown.  
  11. Let stand 15 minutes before cutting and serving.

Notes  

  • Raw chicken breast can be quickly prepared by boiling in water for 15-20 minutes until no longer pink. 
  • A whole rotisserie chicken can be used, and that will make 3 cups, but I find it is a bit fiddly and time consuming for me as I loathe stripping the dark meat. 
  • Sometimes I purchase a couple of already prepared "dinners" at the grocery store that include two chicken breasts and some macaroni or potato salad, for $5 (usually I pick them up when they also have a $1 off sticker on them), and then repurpose the salad, and chop up the chicken breasts. 
  • Leftover chicken that has been tossed in the freezer works too. Just make sure you have 4 cups.


Sunday, March 21, 2021

Restaurant Style Coleslaw

This coleslaw is amazing, whether it is served with a lovely English fish and chips meal, or served as a side with burgers, sausages and hotdogs on a summertime BBQ, or even as a topper for a pulled pork/chicken sandwich.  


Pulled pork sandwich topped with coleslaw

Ingredients


1 lb bag coleslaw mix (shredded green cabbage, purple cabbage, and carrots)
2 tablespoons diced onion
⅔ cup mayonnaise
3 tablespoons vegetable oil
½ cup white sugar
1 tablespoon white vinegar
¼ teaspoon salt

Directions

  1. Combine the coleslaw mix and onion in a large bowl.
  2. In a measuring cup or medium bowl, whisk together the mayonnaise, vegetable oil, sugar, vinegar, and salt, until blended thoroughly.
  3. Pour the dressing mixture over coleslaw mix and toss to coat. 
  4. Chill at least an hour before serving. 

Notes  


This is even better when made ahead and chilled overnight.  It keeps fresh for quite a long time, just give it a mix before serving, as the dressing will tend to settle at the bottom. 

Homemade Chorizo

One of the first things my husband introduced me to was chorizo, a spicy Mexican meat that he cooked up with eggs for breakfast on one of my visits to see him in Southern California.  I loved the taste of it, but wasn't too keen on the texture, mostly the grisly bits of snouts, tails and other random stuff that's typically part of the deal in the prepackaged links you buy in the grocery store. 


This chorizo on the other hand, contains only ground meat, and has all the flavour without the gross bits.  It's delicious, easy to make, and way better than store bought.  I typically portion this out into 1 1/2 lb bags and toss one in the freezer for another week. 


My husband is in seventh heaven when I take the time to make this for him. This makes a quick and easy breakfast, whether it's just breakfast burritos or within a full-on chorizo, potato and scrambled eggs skillet for the boys.


Ingredients

2 pounds ground beef
1 pound ground pork
¾ cup chili powder
¾ teaspoon dried oregano
3 cloves garlic, minced
2 teaspoons salt
¾ cup chicken stock
¼ cup white vinegar

Directions

  1. In a large bowl or stand mixer, mix together the ground beef, ground pork, chili powder, oregano, garlic, salt, chicken stock and vinegar. 
  2. Divide into two or more freezer bags (I use two one-gallon bags) and refrigerate for 2 to 3 days, taking out daily to mix thoroughly.

Notes

The first photo shows the chorizo this recipe makes.  The following photos show it being prepared with potatoes and scrambled eggs, which the boys enjoy served with or in tortillas.
This chorizo keeps many days in the refrigerator, but if you're not going to cook with it all soon-ish, do store it in the freezer.
I find that mixing in my Kitchenaid stand mixer with the flat paddle makes this such easy work. 


Banana Snacking Cake

This recipe brings back memories of my childhood when my Mum would sometimes make something called "Snacking Cake", a boxed mix of scrummy good cake that was an occasional treat. I don't use box mixes very often in my house, occasionally the boys will make boxed brownies, but I'd much rather just make from scratch so I know all the ingredients I'm putting in our mouths. It's quick to whip this together and get it in the oven and is a nice change from regular banana bread.  I don't ice it, but you can certainly do so if you'd like!


Ingredients

1 cup white sugar
½ cup unsalted butter
2 eggs
4 ripe bananas, mashed
2 cups all-purpose flour
1 teaspoon baking soda
½ teaspoon salt
½ cup chopped walnuts (optional)
1 teaspoon vanilla extract

Directions

  1. Preheat oven to 375° F.
  2. Grease and flour a 9" x 13" cake pan.
  3. Cream together the butter and the sugar.
  4. Add eggs, bananas, flour, soda, salt, nuts (if using), and vanilla.
  5. Mix thoroughly and pour batter into the prepared pan.
  6. Bake for 30 minutes.
  7. Cool before cutting into 24 squares.


Tuesday, July 7, 2020

Cowboy Beans

My boys love their BBQ!  If given the chance they would have ribs, brisket, pulled pork, bbq beans, and cornbread for every meal.  The boys say these beans are just like they'd expect to be served from our local BBQ restaurant!

Prepared in your slow cooker, this bean dish, with added ground beef and bacon, is rich and meaty.  This dish is hearty enough to eat as a main course.  Go wild and serve with cornbread or tortilla chips, and top with sour cream, shredded cheese or chopped onions.  It is equally delicious as a side dish along side your favourite BBQ dishes.


Ingredients


1 pound ground beef
1 pound bacon, diced
1 medium onion, diced
2 cans (398mL each) Bush's Original Baked Beans  
1 can (528mL) whole pinto beans, with liquid
250 mL PC Hickory Smoke BBQ Sauce
250 mL Kraft Original BBQ Sauce
1 tablespoon Worcestershire Sauce
1 tsp garlic powder
1/4 cup brown sugar

Directions

  1. Combine baked beans, pinto beans, BBQ sauces, Worcestershire sauce, garlic powder and brown sugar in a large crockpot.  Stir to blend well.
  2. In a large frying pan, cook diced bacon until crisp and golden.  Remove from pan with slotted spoon and add to crock pot.
  3. Add onion to the bacon fat and fry until softened and lightly golden.  Remove from pan with slotted spoon and add to crock pot.  Pour off excess fat.
  4. Place ground beef in pan and cook until no longer pink.  Remove from pan with slotted spoon and add to crock pot.
  5. Cook on low for 4-5 hours or on high for 2-3 hours. 
Notes:
Leftover beans can be stored in an airtight container in the fridge for up to 4-5 days or in the freezer for up to 4 months. Reheat in the microwave.


Friday, March 13, 2015

Cake, cake, and more cake !

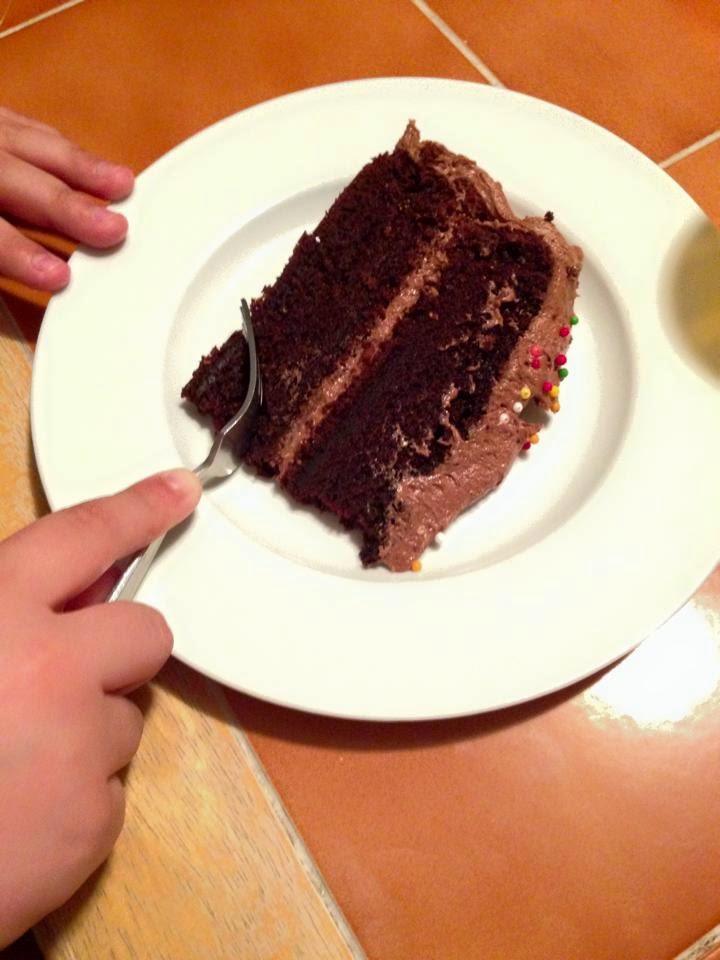
I first made this recipe for a cake for my husband’s 50th surprise birthday party last June.  I received a lot of compliments about this rich and moist cake, and it’s now my go-to recipe for birthdays and other special occasions.  
Super easy to make, there’s no need for a boxed cake mix or canned frosting for this delicious chocolate layer cake!  
Since last June, I've made quite a few variations on this cake. 
My husband's choice was with vanilla frosting.  


In November, my middle child wanted a quasi-black forest cake with chocolate frosting and cherry pie filling.  This was quite messy to make, as the cherry pie filling kept oozing out the side while I was trying to frost it.  


In early March, my youngest child wanted chocolate on chocolate with sprinkles on top. Simple and delicious. 


I also used this cake (with vanilla frosting) for the cake in my Kit Kat Cake I made this past weekend.  This cake was a huge hit!


Note:  The recipe for the vanilla frosting is made exactly the same as the one below, except it omits the cocoa.  

I hope you enjoy this cake as much as we all do!

Super Easy and Delicious Chocolate Cake

For the Cake

Ingredients

2 cups granulated sugar
1 3/4 cups all-purpose flour
3/4 cup natural cocoa powder
1 1/2 teaspoons baking powder
1 1/2 teaspoons baking soda
1 teaspoon salt
2 eggs
1 cup milk
1/2 cup vegetable oil
2 tablespoons vanilla extract
1 cup boiling water

Directions

  1. Preheat oven to 350 degrees F. Grease and flour two nine inch round pans.
  2. In a large bowl, whisk together the sugar, flour, cocoa, baking powder, baking soda and salt. 
  3. Add the eggs, milk, oil and vanilla, mix for 2 minutes on medium speed of mixer. 
  4. Stir in the boiling water last. Batter will be thin. 
  5. Pour evenly into the prepared pans.
  6. Bake 30 to 35 minutes in the preheated oven, until the cake tests done with a toothpick. 
  7. Cool in the pans for 10 minutes, then remove to a wire rack to cool completely.

For the Frosting

(makes enough for one 8" or 9" round layer cake, or about 30 cupcakes)

Ingredients

1 cup unsalted butter, softened
1/2 cup natural cocoa, sifted
5 cups icing sugar, sifted
1 teaspoon vanilla extract
1/4 cup milk or cream

Directions

  1. In a large bowl, beat butter and cocoa together until smooth.
  2. Stir in vanilla and icing sugar.
  3. Slowly add milk, a little at a time, until frosting reaches desired consistency.
  4. Scrape sides of bowl and whip until light and fluffy, about 2 minutes.


Monday, October 21, 2013

Perfect-Every-Time White Sandwich Bread

Homemade bread.  There's nothing tastier than hot out-of-the-oven bread ... lovingly and painstakingly made by hand.  With this family's busy schedule, it seems I just don't have time to make handmade bread very often.  Certainly not nearly as often as I would like to feed the family homemade bread.  


Water, sugar and yeast in the pan

I owned a bread maker several years ago but barely used it.  I'm not sure if it was the recipes or the maker, but I never found a recipe whose results I was happy with, and so I got rid of it.  About a year ago, I saw a bread maker on sale and decided I'd give machine bread making another try.


Flour, salt and oil added; now starting to blend

My bread maker makes it so easy to make fresh bread for my family.  The breads at the grocery store are chock-full of preservatives which keep them shelf stable for weeks.  My hungry boys now consume enough bread that I don't have to worry so much about shelf stability, and I'd much rather make it using fresh ingredients and fewer chemicals.


My quest for the perfect loaf began.  I began testing, trying and tweaking various recipes in order to come up with something quick and easy that would produce a perfect everyday bread for sandwiches or toast.  This recipe makes a soft, light-textured 1 ½ lb loaf which has quickly become my family's favourite.  


I've also used this recipe as a base for cheese bread which was absolutely delicious!  Just add about a pound of cheese (cubed) when machine signals you for add-ins.


Ingredients


1 cup warm water (about 100-110
° F)
2 tbsp white sugar
2   1/4 tsp bread machine yeast
1/4 cup vegetable oil
3 cups bread flour
1   1/2 tsp salt

Directions for Bread Maker

  1. Place the water, sugar and yeast in the pan of the bread machine. 
  2. Let the yeast dissolve and foam for about 10 minutes.  
  3. Add the oil, flour and salt to the yeast mixture.  
  4. Choose: (A) 1 1/2 lb size; (B) light crust**; and (C) sandwich setting (basic or white setting also work well).

Directions for Baking in Oven

  1. Place the water, sugar and yeast in the pan of the bread machine. 
  2. Let the yeast dissolve and foam for about 10 minutes.  
  3. Add the oil, flour and salt to the yeast mixture.
  4. Choose the dough cycle.  
  5. Once the cycle is complete, remove the dough and knead a few times.
  6. Place in prepared bread pan.  
  7. Cover with clean tea towel and let rise to about an inch above the rim of the pan.  
  8. Bake at 350° F for about 15 minutes or until golden brown.
** I find that using a darker setting makes the crust too thick and much too dark with this recipe